Please select an article from the left menu to display its content.
Automation lets you set up rules inside a Studio app so that routine actions happen on their own, instead of a user having to trigger them by hand every time. Each automation follows a simple "When this happens → Then do this" pattern: you pick an event that occurs on a form (a record being created, edited, or a specific field changing), and pair it with one or more actions the system should carry out automatically when that event occurs — sending an API request, emailing someone, generating a document, creating a master record, or creating a record in another LogixFlow module such as CRM, FreightNX, or DMS. Automation is configured per form, from the Automation tab of the Studio app designer.
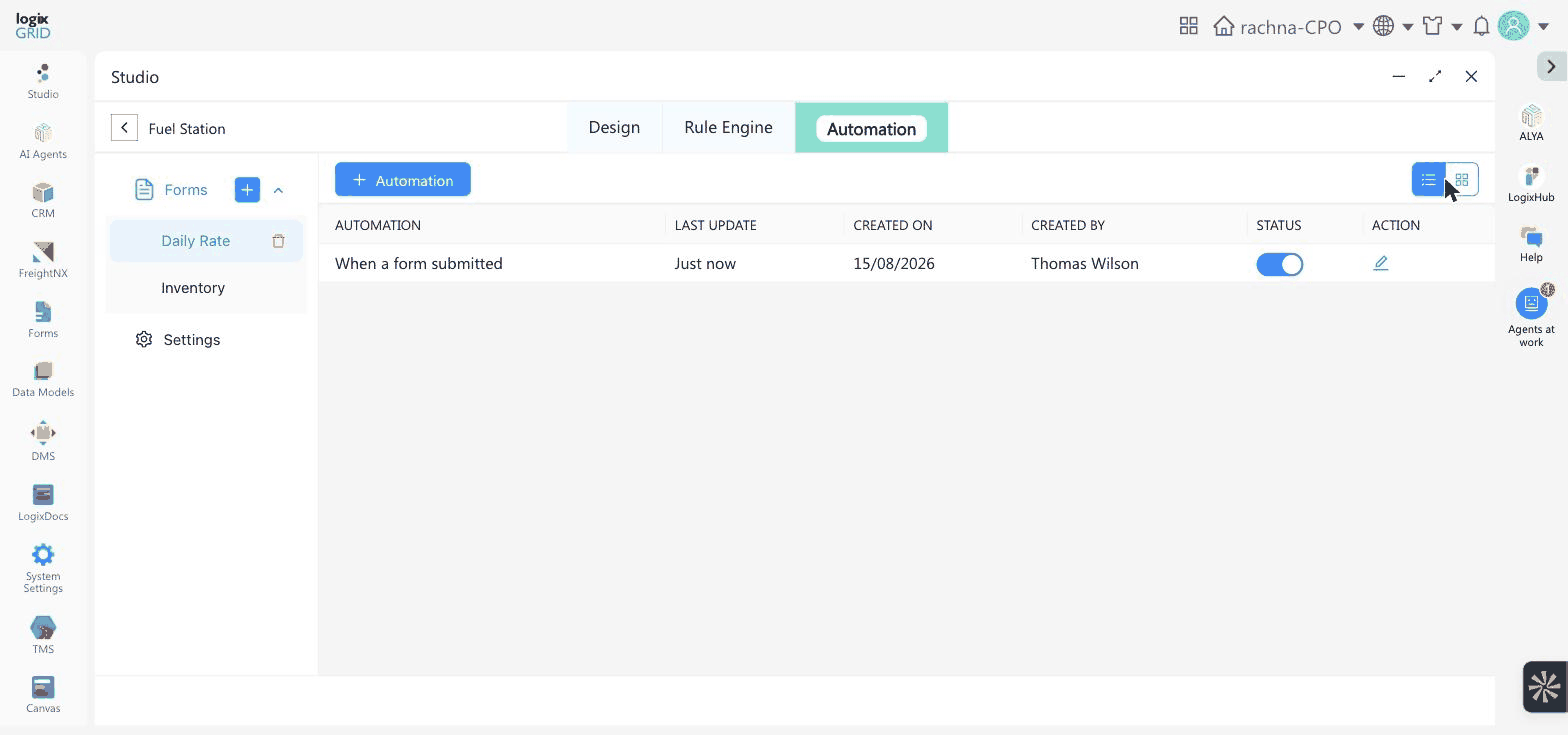
Getting to Automation
- Open Studio from the left sidebar and select the app you want to configure.
- Click Edit on the app card to open the app designer.
- In the left Forms panel, select the form the automation should apply to. (Automation is scoped to a single form — if no form is selected, the tab shows a Form Not Selected placeholder.)
- Click the Automation tab at the top of the designer.
- Click Create Automation (or +) to start a new rule, or open an existing one to edit it.
Step 1: Choose the trigger — "When this happens"
Every automation starts with a trigger — the event that causes the automation to run. Choose one:
- When a form is submitted — runs when a new record is created on this form.
- When a record is edited — runs whenever an existing record on this form is updated.
- When a column value changes — runs only when a specific field changes value. Select the Column to watch, then enter the value (or value condition) that should trigger the automation.
Step 2: Choose one or more actions — "Then do this"
After the trigger, add one or more actions to run. Click + to add each action; multiple actions can be attached to the same trigger and will run together. Available actions are:
| Action | What it does |
|---|---|
| Send API Request | Calls an external API when the trigger fires. Configure the HTTP method (e.g. GET, POST) and URL, plus optional Query Params, Headers, Body, and Authentication. See the linked guide for full setup details. |
| Send an email to someone | Sends an automatic email, useful for notifying a person or team when the trigger condition is met. |
| Create LogixDocs | Generates a document from an existing LogixDocs template already created for this app — for example, auto-issuing an invoice or confirmation when a record is created. |
| Create LogixFlow Master Data | Creates a new master record in the system, such as a Customer, User, or Vendor. |
| Create LogixCRM Record | Creates a new Lead or Opportunity record in LogixCRM. Needs field mapping — see Step 3 below. |
| Create FreightNX Shipment | Creates a new Shipment in FreightNX. Needs field mapping — see Step 3 below. |
| Create LogixDMS Shipment | Creates a new Shipment in LogixDMS. Needs field mapping — see Step 3 below. |
If you added Create LogixCRM Record, Create FreightNX Shipment, or Create LogixDMS Shipment, continue with Step 3 to map its fields before you save. For any other action, skip ahead to Step 4.
Step 3: Map fields for a LogixCRM, FreightNX, or DMS action
This step only applies if you added Create LogixCRM Record, Create FreightNX Shipment, or Create LogixDMS Shipment in Step 2. Skip to Step 4 if you didn't. All three actions work the same way — once you've mapped one, you know how to map the others.
Open the mapping editor:
- On the action you just added, a Master Data panel opens automatically, listing what you can create:
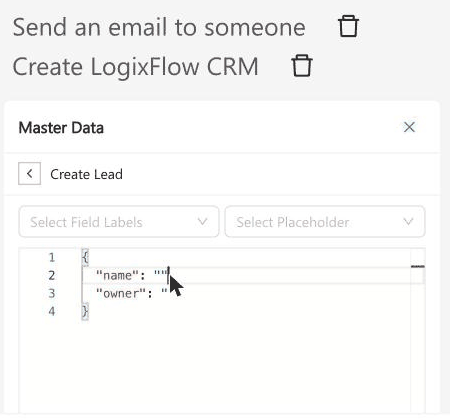
- Create LogixFlow CRM offers two options — Create Lead and Create Opportunity.
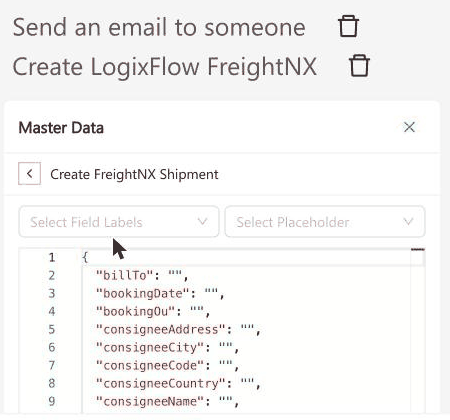
- Create LogixFlow FreightNX offers one option — Create FreightNX Shipment.
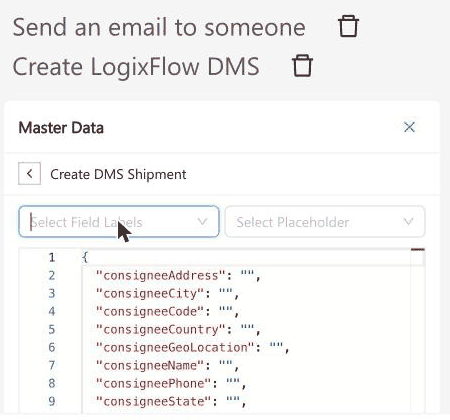
- Create LogixFlow DMS offers one option — Create DMS Shipment.
- Click the option you want. LogixFlow opens the field-mapping editor for that record type.
How the mapping editor works:
The editor has two dropdowns above a code editor:
- Select Field Labels — the fields the target module (CRM, FreightNX, or DMS) accepts. Choosing one inserts an empty field at your cursor position, for example
"fieldName": "". - Select Placeholder — the fields on your Studio form. Choosing one inserts a placeholder token at your cursor position, for example
{{FieldName}}.
The code editor holds the actual field map LogixFlow sends when the automation runs. It starts pre-filled differently depending on the action:
- Create Lead and Create Opportunity start with a short template — just
nameandowner— since LogixCRM needs very little to create a record. Add more fields yourself with Select Field Labels as needed. - Create FreightNX Shipment and Create DMS Shipment start with a larger template that already lists the core shipment fields, including billing details and consignee/consignor address information. For these two, Select Field Labels only offers the additional optional fields not already in the template — for example Airline, Commodity, or Cargo Value.
Map a Studio field to a target field:
- Click inside the code editor, between the quotes of the value you want to fill in — for example, the empty quotes after
"name":. - Open Select Placeholder and choose the Studio form field that should supply the value. LogixFlow inserts it as a token, for example
"name": "{{CompanyName}}". - If the target field you need isn't in the code editor yet, open Select Field Labels and choose it. This adds a new
"fieldName": ""line, which you can map the same way. - Repeat for every field you want to send. You can mix plain text with placeholders in the same value, for example
"reference": "WEB-{{OrderNumber}}". - If a Validate JSON button is available, use it to confirm the JSON is well-formed before saving.
| Action | Record type(s) | Starting template |
|---|---|---|
| Create LogixCRM Record | Lead or Opportunity | Minimal — name and owner only. Map both, plus any other CRM fields you add. |
| Create FreightNX Shipment | Shipment | Pre-filled with core shipment fields (billing, booking, consignee/consignor address details). Add more via Select Field Labels if needed. |
| Create LogixDMS Shipment | Shipment | Pre-filled with core shipment fields (consignee/consignor address details and related information). Add more via Select Field Labels if needed. |
Step 4: Save
Once the trigger and at least one action are configured — and any CRM, FreightNX, or DMS action has its fields mapped — save the automation. It becomes active immediately and will run automatically whenever its trigger condition is met on this form.
You can create as many automations as you need on the same form, each with its own trigger and set of actions. Every automation you create appears in the automation list with a Status toggle — use it to activate or deactivate an automation at any time without deleting it, which is useful for pausing a rule temporarily or switching it off while you make changes elsewhere.