Please select an article from the left menu to display its content.
The Rule Engine empowers you to automate form behaviors, ensuring dynamic responses to user inputs. Define rules to control field visibility, requirements, and values when users create, edit, or view records — or trigger them manually with a custom action button.
Accessing the Rule Engine
To begin creating rules:
-
Open your app in Studio and click Edit.
-
Select the Rule Engine tab at the top of the screen (alongside Design and Automation).
Setting Up Rules
When you create a new rule, give it a Rule Name and an optional Description so it's easy to identify later.
Trigger Events
Specify when rules should execute:
-
Create - Applies only when new records are created
-
Edit - Applies only when existing records are modified
-
Create & Edit - Applies in both scenarios
-
When Someone View Record - Applies when a record is simply opened for viewing, without being created or edited
How the Rule Runs
Choose how the rule is triggered:
-
Automatically (Based on Events) - The rule runs on its own whenever the selected trigger event and conditions are met. This is the default mode described above.
-
Manually (Via Button Click) - The rule only runs when a user clicks a custom action button that you add to the form.
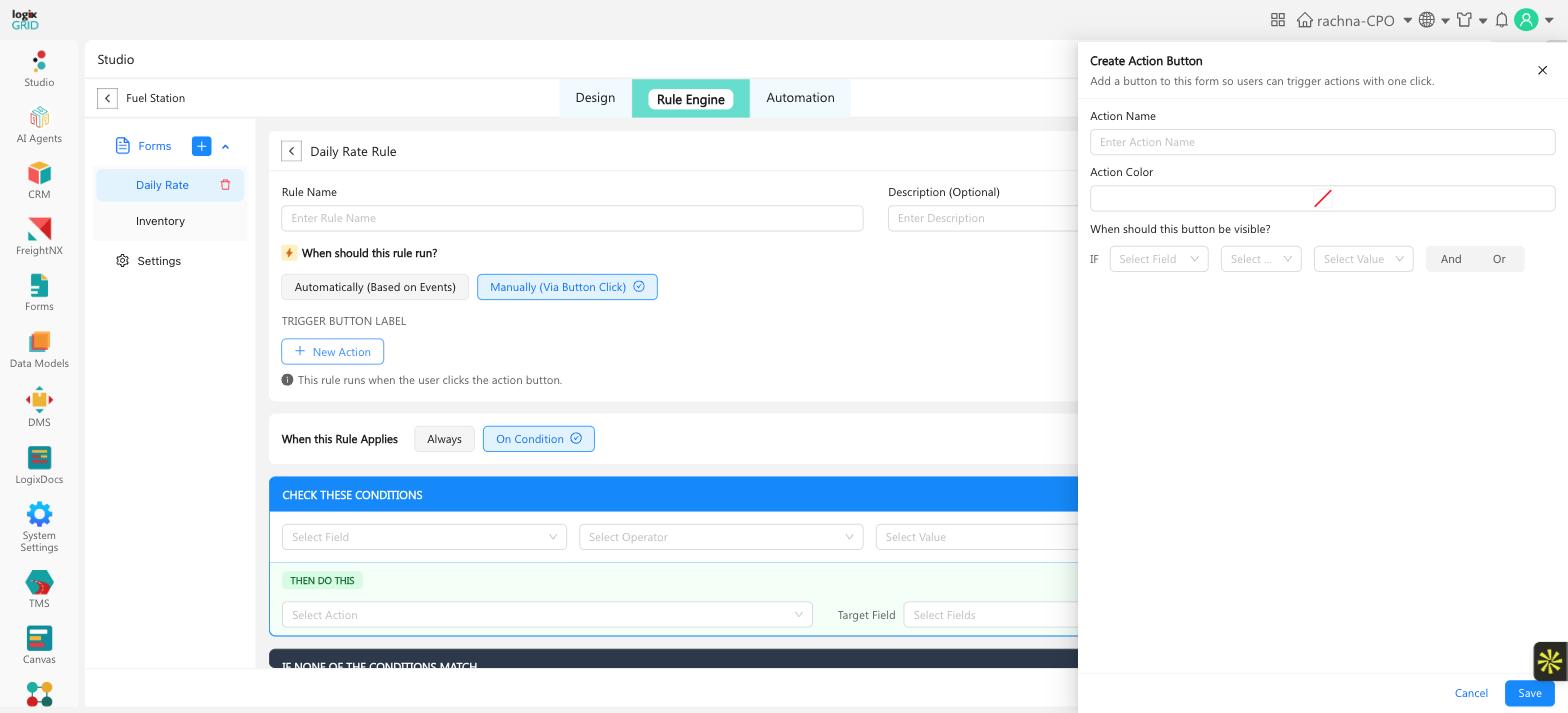
When you choose Manually (Via Button Click), use the Create Action Button panel to configure the button:
-
Action Name - The text shown on the button.
-
Action Color - The button's color on the form.
-
Visibility Conditions - An optional IF-based condition builder to control when the button itself is shown, so it only appears for the users or records where it's relevant.
Good to know: Manually-triggered rules are useful for actions a user should confirm themselves — for example, an "Approve" or "Recalculate" button — rather than something that should happen automatically the moment a record is saved.
Rule Conditions
Determine how rules are applied:
-
Always - Executes the rule unconditionally
-
On Condition - Activates only when specified criteria are met
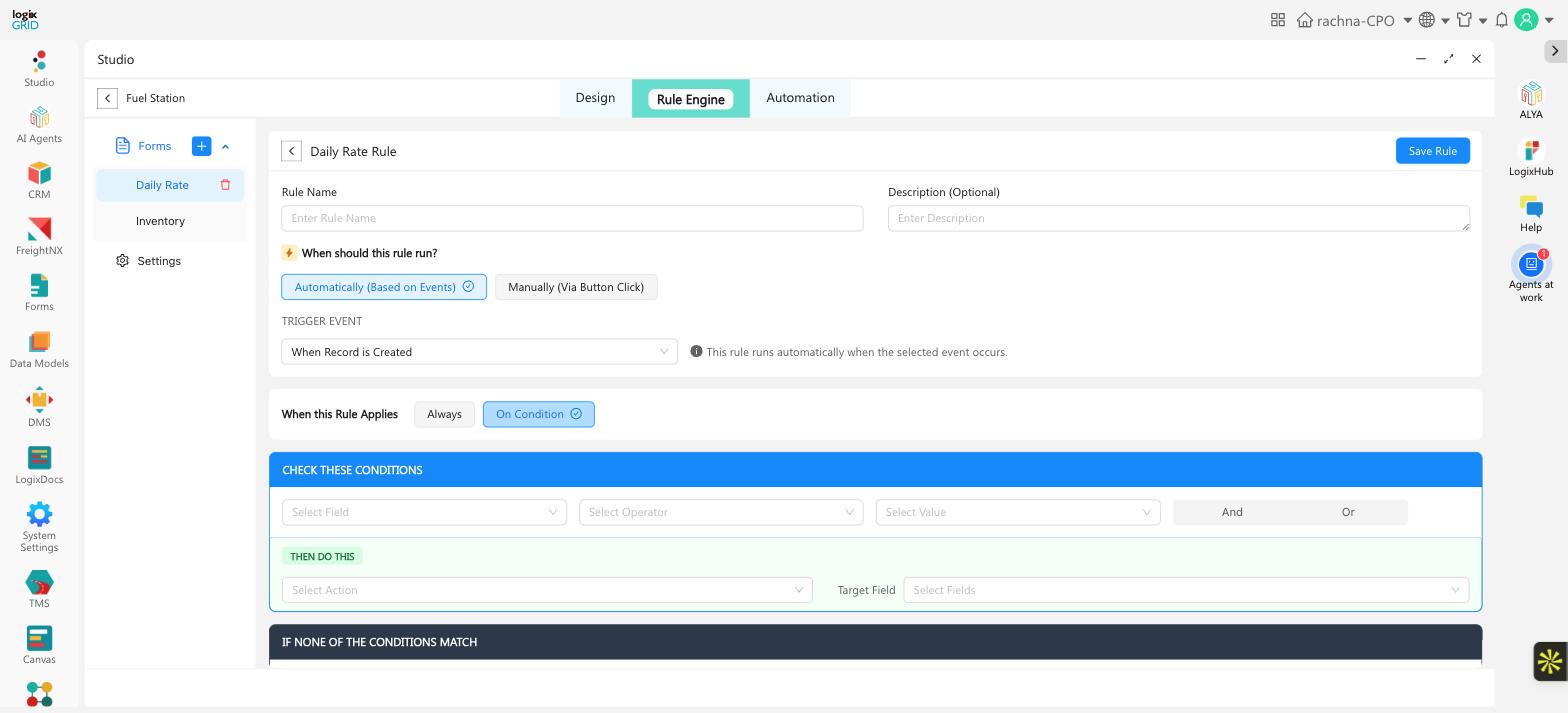
When you choose On Condition, build one or more condition blocks:
-
Each condition is built from a Field, an Operator, and a Value.
-
Chain additional conditions within the same block using And / Or.
-
Click + Another Condition to add a further, independent condition block with its own action.
-
Use IF NONE OF THE CONDITIONS MATCH to define a fallback ("else") action that runs when none of the conditions in the rule are met.
Available Actions
Choose from these rule actions:
Field Visibility
-
Show hidden fields when conditions are met
-
Hide fields based on user input
Field Accessibility
-
Enable fields to make them editable
-
Disable fields to make them read-only
Field Requirements
-
Mark fields as mandatory based on conditions
Field Values
-
Automatically populate field values
Selecting Target Fields
Specify which form fields will be affected by each rule.
Creating Conditional Rules
For conditional rules:
-
Select the field that will trigger the condition
-
Define the trigger value (e.g., "Country equals US"), chaining additional conditions with And/Or if needed
-
Choose the action to execute when the condition is met
-
Select the target field(s) for the action
-
Optionally, click + Another Condition to add more independent condition blocks, or set an action under IF NONE OF THE CONDITIONS MATCH to handle every other case
Best Practices
Multiple Rules
-
Create separate rules for different conditions
-
Rules execute in the order they are listed
Testing
-
Always test rules in preview mode before publishing
-
Verify both the triggering conditions and resulting actions
Organization
-
Name rules clearly to indicate their purpose
-
Group related rules together for easier management
Example Use Cases
Dynamic Field Display
Show
"State" field only when "Country" is set to "US"
Automatic Calculations
Set "Tax
Rate" field value when "Product Type" is selected
Conditional Requirements
Make
"Emergency Contact" required when "High Risk" is checked
Manual Action Button
Add an "Approve Request" button (Manually / Via Button Click) that only appears when "Status" equals "Pending Approval", and sets "Status" to "Approved" when clicked